

Table of Contents
- Why Your Ergonomic Office Setup Matters More Than Ever in 2026
- What You'll Need Before You Start
- Step 1: Get Your Chair Right with This Ergonomic Chair Adjustment Guide
- Step 2: Set Your Monitor Height and Distance
- Step 3: Position Your Keyboard, Mouse, and Pick the Best Ergonomic Mouse Pad for Wrist Support 2026
- Step 4: Dial In Desk Height, Lighting, and Foot Support
- Step 5: Learn How to Prevent Wrist Pain at Work
- Common Mistakes to Avoid in Your Ergonomic Office Setup
- Frequently Asked Questions
Last Updated: September 13, 2026
Why Your Ergonomic Office Setup Matters More Than Ever in 2026
An ergonomic office setup is the deliberate arrangement of your chair, desk, monitor, and peripherals so your body holds a neutral posture through the working day. At Dabbous Mega Supplies, we've supplied office and computer equipment across Lebanon since 1952, and we've noticed a common pattern: people often prioritize hardware while overlooking the ergonomic setup that impacts their comfort and well-being. Desk-related discomfort can often stem from a combination of factors, such as a monitor positioned too low, inadequate chair support, and prolonged periods of sitting.
The fix is a sequence, not a shopping spree. This guide walks through five steps in order, because getting your chair right before your monitor saves you from redoing the setup twice.
What You'll Need Before You Start
Gather these before you adjust anything:
- A tape measure
- A chair with adjustable seat height and a backrest
- A footrest if your feet don't reach the floor after Step 1
- A monitor stand, riser, or monitor arm
- A keyboard and mouse you can position independently of the desk surface
- A small notebook or phone note to record your settings
Total time: 45-60 minutes. Difficulty: Beginner. You don't need tools for most of this, though a monitor arm may need a screwdriver.

Step 1: Get Your Chair Right with This Ergonomic Chair Adjustment Guide
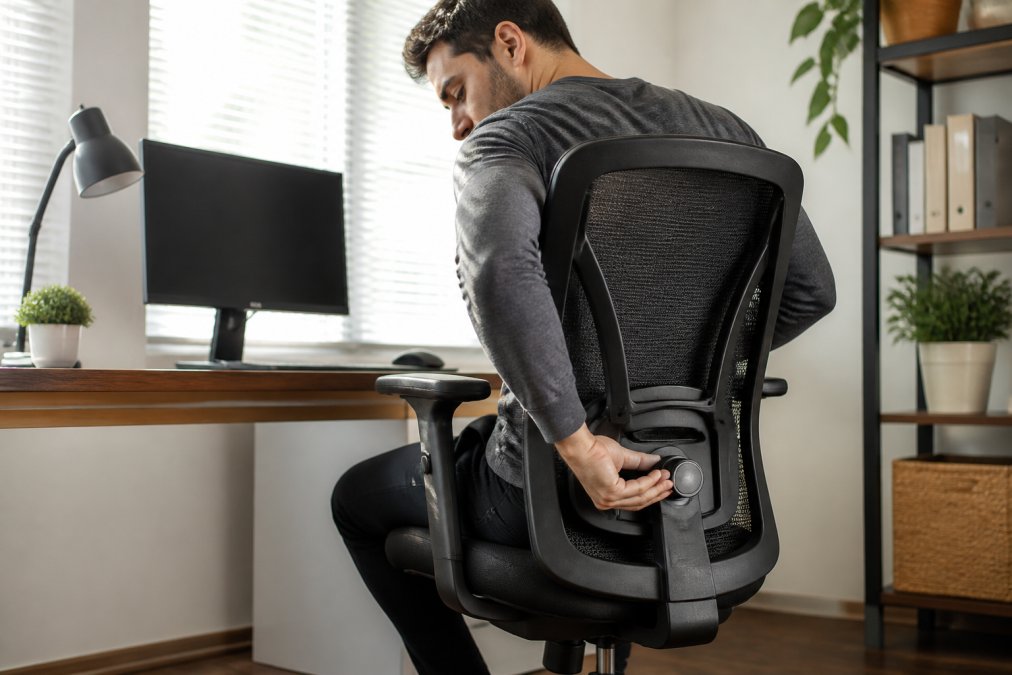
Start with the chair because every other measurement depends on it. If you set your monitor height first and then change your seat, you'll be re-measuring everything within the hour. Work through the four adjustments below in order, height, depth, backrest, armrests, because each one changes the geometry of the next.
1. Seat Height: Anchor Everything to Your Popliteal Height
Sit with your feet flat and your back against the backrest. Raise or lower the seat until your knees sit at roughly a 90-degree angle and your thighs are parallel to the floor. The measurement that matters is your popliteal height, the distance from the floor to the crease behind your knee, because that is the seat height your body wants.
If your chair bottoms out before your feet reach the floor, don't slide forward or tuck your feet under the seat, add a footrest. A chair that's too high can place undue pressure on your thighs, potentially contributing to lower-back fatigue.
2. Seat Depth: Two to Three Fingers Behind the Knee
Slide your hips all the way back until your lower back contacts the backrest. Leave a gap of about two to three fingers between the back of your knees and the front edge of the seat. Too deep, and you'll slouch forward to reach the backrest; too shallow, and your thighs take the load instead of the cushioning.
If your chair has a sliding seat pan, use it. If it doesn't, a lumbar cushion behind your lower back effectively shortens the seat pan, the cheapest fix for a chair that's too deep.
3. Backrest Angle and Lumbar Pad Placement
A slight recline of around 100 to 110 degrees can help reduce pressure on the cervical spine compared to a rigid upright position. Recline the backrest, then bring it forward until your weight is distributed evenly between your seat bones and your back.
The lumbar pad belongs in the curve of your lower back, roughly at belt-line height or just above it, not at shoulder-blade level, and not so low that it pushes your pelvis forward. If your chair has a backrest tension control, loosen it slightly so the backrest follows your movement instead of forcing one fixed posture.
4. Armrests: Shoulders Down, Elbows at 90 Degrees
Adjust armrest height so your shoulders stay relaxed and your forearms rest lightly, not so high that your shoulders creep toward your ears. Your elbows should sit at roughly a 90-degree angle with your upper arms hanging naturally. If your armrests push your shoulders up even at their lowest setting, remove them or swing them aside, no armrests beat armrests that fight your posture.
A Quick Chair Self-Check
Before you move to Step 2, run this check:
- Feet flat on the floor or on a footrest, knees at ~90 degrees
- Two to three fingers of clearance behind the knees
- Lower back in contact with the lumbar pad, not arched away from it
- Shoulders down, elbows at ~90 degrees, forearms supported
- No pressure points under the thighs or behind the knees
Step 2: Set Your Monitor Height and Distance
Position the top of your screen at or just below eye level, roughly an arm's length away. That single rule fixes the most common cause of neck strain: tipping your head down for eight hours.
Sit back in your chair, close your eyes, then open them. Your gaze should land near the top third of the screen, not the middle or bottom. If your monitor sits too low, a riser or monitor arm raises it without a new desk. Distance matters too: too close and your eyes work harder; too far and you lean forward, undoing Step 1.
For a dual-monitor setup, place your primary screen directly in front of you and angle the second inward by about 30 degrees. Avoid centering yourself between two screens unless you use them equally, as this can lead to constant head turns that may contribute to shoulder tension.
Step 3: Position Your Keyboard, Mouse, and Pick the Best Ergonomic Mouse Pad for Wrist Support 2026
Keyboard and mouse placement significantly influences wrist and shoulder health. The goal: a straight line from elbow through wrist to hand, with no upward bend at the wrist.
Keyboard and Mouse Placement
Keep your keyboard flat or with a slight negative tilt, far edge slightly higher than the near edge. Wrist rests are for resting between keystrokes, not typing on. Keep the mouse close so you're not reaching across the desk, and set pointer speed high enough to cross the screen with small movements rather than long sweeps.
Mouse Pad Features That Help
A supportive mouse pad gives your wrist a consistent surface and keeps your forearm level with your mouse. Look for a gel or memory foam wrist rest, a non-slip base, and enough surface area to move without lifting your hand. A raised wrist support helps most when your desk is slightly too high for your chair, common in shared offices where nobody adjusts anything.
Step 4: Dial In Desk Height, Lighting, and Foot Support
Set desk height so your elbows sit at roughly a 90-degree angle with your shoulders relaxed. If your desk is fixed and too high, raise your chair and add a footrest rather than letting your feet dangle, which shifts pressure onto your thighs and lower back.
Foot support matters more than most people expect. An adjustable footrest like the AIDATA FR008 footrest we stock keeps your feet planted and lets you change leg position through the day, reducing postural fatigue. For lighting, place your monitor perpendicular to windows so glare doesn't wash out the screen, and avoid a bright window directly behind the monitor. If you can see a light source reflected on your screen, so can your eyes, all day.

| Setup Problem | Adjustment | What It Fixes |
|---|---|---|
| Feet don't reach floor | Raise chair, add footrest | Thigh pressure, lower back strain |
| Monitor too low | Riser or monitor arm | Forward head posture, neck strain |
| Wrists bend upward | Lower keyboard or raise chair | Wrist alignment, strain risk |
| Screen glare | Move desk perpendicular to window | Visual comfort, eye fatigue |
Step 5: Learn How to Prevent Wrist Pain at Work
Preventing wrist pain at work comes down to two habits: keeping your wrist neutral while you type, and breaking up static postures before tension builds. No adjustment replaces movement.
Research suggests that prolonged unbroken sitting can be a risk factor for musculoskeletal health. Sustained low-level muscle contraction may reduce blood flow to tissues, potentially contributing to discomfort. That's why the cadence of your breaks matters more than the length of any single stretch.
The 30/45/90 Break Framework
Use three tiers of movement so you're never relying on one long break to undo eight hours of sitting:
- Every 30 minutes: a 20-second reset. Stand up, roll your shoulders back five times, and sit back down. This is short enough that you'll actually do it.
- Every 45 to 60 minutes: a 2-minute movement break. Walk to refill water, do the wrist and neck stretches below, or take a short walk to the printer.
- Every 90 minutes: a 5-minute break that changes your posture entirely, stand, walk, or stretch somewhere other than your desk.
Set a timer or use your phone's stand reminder. The point isn't the stretch itself; it's interrupting the static load before tension accumulates.
Micro-Breaks and Desk Stretches
Run this sequence at your 45-minute break. It takes about two minutes and covers the areas desk work tightens most:
- Wrist extension stretch: extend your arm, palm down, and gently pull the fingers back with the other hand. Hold 15 seconds per side. This counteracts the downward bend that typing creates.
- Wrist flexion stretch: extend your arm, palm up, and gently pull the fingers down. Hold 15 seconds per side.
- Shoulder rolls: five slow rolls backward, then five forward. Keep the movement slow enough that you feel the shoulder blade travel.
- Chin tucks: pull your chin straight back, hold five seconds, repeat five times. This counteracts forward head posture.
- Standing hip flexor stretch: step one foot forward, tuck your pelvis, hold 20 seconds per side. This is the stretch that undoes the shortening caused by long sitting.
- Doorway chest stretch: place forearms on a doorframe, step through gently, hold 20 seconds. This opens the chest that keyboard work rounds forward.
Small-Space and Budget Adjustments
If your workspace is a corner of a bedroom, a kitchen table, or a shared apartment, you don't need a dedicated office to get the ergonomic benefits. Three adjustments cover most small-space setups:
- Laptop-only setups: raise the laptop on a stack of books or a cheap riser until the screen is at eye level, then add a separate keyboard and mouse at desk height. This is the single highest-value change for laptop users.
- Shared or temporary desks: keep a folding footrest and a lumbar cushion within reach so you can convert any table into a workable station in under a minute.
- Budget DIY fixes: a rolled towel behind your lower back substitutes for a lumbar pad; a stack of books substitutes for a monitor riser; a box under the desk substitutes for a footrest. None of these cost anything, and all three address the same geometry that expensive equipment does.
Common Mistakes to Avoid in Your Ergonomic Office Setup
The biggest mistake is adjusting everything at once and never checking whether the changes held. Do one step, use it for a day, then move to the next.
Other traps worth naming:
- Buying a new chair before adjusting the one you have. Most chairs have more adjustment range than their owners ever use.
- Setting the monitor by how it looks, not by eye level. A screen that looks fine while you're leaning back can be badly placed once you sit properly.
- Ignoring the mouse hand. People obsess over keyboard position and let the mouse drift to the far corner of the desk.
- Skipping the footrest because it feels optional. It isn't, especially if you're shorter than the desk was designed for.
- Treating it as a one-time task. Ergonomic assessment is ongoing; your body changes, and so should your settings.
If you're equipping a small office or home workspace in Lebanon, Dabbous Mega Supplies carries monitors, footrests, desk organizers, and the accessories that make these adjustments possible, with delivery across the country. Customers consistently mention fast delivery and competitive pricing, which matters when you're outfitting more than one desk.

Setting up an ergonomic workspace is a process of small, deliberate adjustments, and the payoff shows up in how you feel by Thursday afternoon, not in a single purchase. Dabbous Mega Supplies has supplied Lebanese offices, schools, NGOs, and home professionals with reliable equipment since 1952, from monitors and footrests to the printing supplies that keep daily operations running. Browse our computer accessories and office equipment range, and get your workspace set up with fast nationwide delivery and support that answers when you call. SHOP NOW.
Frequently Asked Questions
What is the 20-8-2 rule for ergonomics?
The 20-8-2 rule is a break schedule: every 20 minutes, stand up and move for 8 minutes, then sit back down for 2 minutes before repeating. It helps reduce sedentary behavior and postural fatigue. Set a timer to remind yourself. Even short movement breaks improve circulation and reset your neutral posture.
What is the 90-90-90 rule in ergonomics?
The 90-90-90 rule means your elbows, hips, and knees should all rest at roughly 90-degree angles. Adjust your chair height so your feet sit flat and your thighs are parallel to the floor. Then set your keyboard and mouse so your forearms stay level. This alignment supports neutral posture and reduces strain on your cervical spine.
How do I choose the right chair for an ergonomic office setup?
Look for an adjustable chair with lumbar support, depth adjustment, and a backrest that reclines slightly. Your feet should touch the floor or a footrest. Test tension control and cushioning before buying. In Lebanon, Dabbous Mega Supplies offers a wide range of computer accessories and office equipment.
Why is wrist support important for long-term office work?
Wrist support keeps your wrist in a neutral position, reducing the risk of repetitive strain injury. Without it, typing and mousing can compress nerves and cause pain. A padded mouse pad with a gel rest or a keyboard tray helps maintain wrist alignment and forearm support during long sessions.


